Supabase is a free and open-source Backend-as-a-Service (BaaS) that can be self-hosted. This guide will walk you through the steps to deploy Supabase using Docker.
What you need
You need an up-to-date version of Docker and Docker Compose, installed on your web-server (e.g., running on Ubuntu 20.04) and a domain, pointed to your server’s IP address.
- Docker installed on your server
- A domain name pointed to your server’s IP address
Note: We’ll use Hetzner Cloud as our hosting provider, but you can use any other provider as well.
Deploy Supabase using docker-compose
Step 1: Update your server and install docker-compose
Simply copy and paste the code below into your cmd/terminal and follow the instructions.
apt update && apt -y upgrade
apt install docker-compose-plugin
Note: We have Docker pre-installed on our server, by using the Docker CE app image inside Hetzner Cloud. Hence, we only need to install the docker-compose-plugin package.
Step 2: Clone the Supabase Git repository to your server
Next, simply clone the Supabase Git repository by running this command:
git clone --depth 1 https://github.com/supabase/supabaseNote: When you use –depth 1, you’re telling Git to only fetch the latest commit. You usually want this.
Step 3: Change the directory to supabase/docker
Now, navigate to supabase/docker by using the cd command.
cd supabase/dockerStep 4: Backup your docker-compose.yml file
Simply run the following command.
cp docker-compose.yml docker-compose.yml.bkpNote: This copy is just a backup, in case you might want to take a look at it later on. Just to be safe, of course.
Step 5: Create your .env file by copying .env.example
Now, you want to create a new .env file by copying the existing .env.example file and naming it .env.
cp .env.example .envStep 6: Stop kong from using ports inside the docker-compose.yml file
Now, you need to commit a few changes to your docker-compose.yml file. These changes include stopping kong from using ports inside said file, otherwise they would be public. You don’t want that.
First, open your docker-compose.yml file.
nano docker-compose.ymlNext, search for the service named “kong” and put a # in front of the three port lines.
kong:
    container_name: supabase-kong
    image: kong:2.8.1
    restart: unless-stopped
    # https://unix.stackexchange.com/a/294837
    entrypoint: bash -c 'eval "echo \"$$(cat ~/temp.yml)\"" > ~/kong'
#    ports:
#      - ${KONG_HTTP_PORT}:8000/tcp
#      - ${KONG_HTTPS_PORT}:8443/tcp
    depends_on:
      analytics:
        condition: service_healthy
    environment:
      KONG_DATABASE: "off"
      KONG_DECLARATIVE_CONFIG: /home/kong/kong.yml
      # https://github.com/supabase/cli/issues/14
      KONG_DNS_ORDER: LAST,A,CNAME
      KONG_PLUGINS: request-transformer,cors,key-auth,acl,basic-auth
      KONG_NGINX_PROXY_PROXY_BUFFER_SIZE: 160k
      KONG_NGINX_PROXY_PROXY_BUFFERS: 64 160k
      SUPABASE_ANON_KEY: ${ANON_KEY}
      SUPABASE_SERVICE_KEY: ${SERVICE_ROLE_KEY}
      DASHBOARD_USERNAME: ${DASHBOARD_USERNAME}
      DASHBOARD_PASSWORD: ${DASHBOARD_PASSWORD}
    volumes:
      # https://github.com/supabase/supabase/issues/12661
      - ./volumes/api/kong.yml:/home/kong/temp.yml:ro
Note: You can save your changes by pressing ctrl + S or ctrl + O and confirm by hitting Enter. To exit the nano editor, simply pressing ctrl + B and hitting Enter to confirm.
Step 7: Remove the dashbord from the kong.yml file
First, navigate to your kong.yml file.
nano volumes/api/kong.ymlNext, remove the entire - dashboard part inside the file.
Step 8: Add nginx to your docker-compose.yml file
Simply open your docker-compose.yml file.
nano docker-compose.ymlOnce inside, you’ll see a section called services: inside, there are different services needed by Supabase to work properly. You want to scroll to the bottom of the file. Right before the services: sections ends, add nginx as a new service.
nginx:
    image: 'jc21/nginx-proxy-manager:latest'
    restart: unless-stopped
    ports:
      # These ports are in format <host-port>:<container-port>
      - '80:80'    # Public HTTP Port
      - '443:443'  # Public HTTPS Port
      - '81:81'    # Admin Web Port
    volumes:
      - ./nginx-data:/data
      - ./nginx-letsencrypt:/etc/letsencrypt
      - ./nginx-snippets:/snippets:ro
    environment:
      TZ: 'Europe/Berlin'
Your final docker-compose.yml file should look similar to this:
# Usage
#   Start:              docker compose up
#   With helpers:       docker compose -f docker-compose.yml -f ./dev/docker-compose.dev.yml up
#   Stop:               docker compose down
#   Destroy:            docker compose -f docker-compose.yml -f ./dev/docker-compose.dev.yml down -v --remove-orphans
#   Reset everything:  ./reset.sh

name: supabase

services:

  studio:
    container_name: supabase-studio
    image: supabase/studio:20250113-83c9420
    restart: unless-stopped
    healthcheck:
      test:
        [
          "CMD",
          "node",
          "-e",
          "fetch('http://studio:3000/api/profile').then((r) => {if (r.status !== 200) throw new Error(r.status)})"
        ]
      timeout: 10s
      interval: 5s
      retries: 3
    depends_on:
      analytics:
        condition: service_healthy
    environment:
      STUDIO_PG_META_URL: http://meta:8080
      POSTGRES_PASSWORD: ${POSTGRES_PASSWORD}

      DEFAULT_ORGANIZATION_NAME: ${STUDIO_DEFAULT_ORGANIZATION}
      DEFAULT_PROJECT_NAME: ${STUDIO_DEFAULT_PROJECT}
      OPENAI_API_KEY: ${OPENAI_API_KEY:-}

      SUPABASE_URL: http://kong:8000
      SUPABASE_PUBLIC_URL: ${SUPABASE_PUBLIC_URL}
      SUPABASE_ANON_KEY: ${ANON_KEY}
      SUPABASE_SERVICE_KEY: ${SERVICE_ROLE_KEY}
      AUTH_JWT_SECRET: ${JWT_SECRET}

      LOGFLARE_API_KEY: ${LOGFLARE_API_KEY}
      LOGFLARE_URL: http://analytics:4000
      NEXT_PUBLIC_ENABLE_LOGS: true
      # Comment to use Big Query backend for analytics
      NEXT_ANALYTICS_BACKEND_PROVIDER: postgres
      # Uncomment to use Big Query backend for analytics
      # NEXT_ANALYTICS_BACKEND_PROVIDER: bigquery

  kong:
    container_name: supabase-kong
    image: kong:2.8.1
    restart: unless-stopped
    # ports:
    #  - ${KONG_HTTP_PORT}:8000/tcp
    #  - ${KONG_HTTPS_PORT}:8443/tcp
    volumes:
      # https://github.com/supabase/supabase/issues/12661
      - ./volumes/api/kong.yml:/home/kong/temp.yml:ro
    depends_on:
      analytics:
        condition: service_healthy
    environment:
      KONG_DATABASE: "off"
      KONG_DECLARATIVE_CONFIG: /home/kong/kong.yml
      # https://github.com/supabase/cli/issues/14
      KONG_DNS_ORDER: LAST,A,CNAME
      KONG_PLUGINS: request-transformer,cors,key-auth,acl,basic-auth
      KONG_NGINX_PROXY_PROXY_BUFFER_SIZE: 160k
      KONG_NGINX_PROXY_PROXY_BUFFERS: 64 160k
      SUPABASE_ANON_KEY: ${ANON_KEY}
      SUPABASE_SERVICE_KEY: ${SERVICE_ROLE_KEY}
      DASHBOARD_USERNAME: ${DASHBOARD_USERNAME}
      DASHBOARD_PASSWORD: ${DASHBOARD_PASSWORD}
    # https://unix.stackexchange.com/a/294837
    entrypoint: bash -c 'eval "echo \"$$(cat ~/temp.yml)\"" > ~/kong.yml && /docker-entrypoint.sh kong docker-start'

  auth:
    container_name: supabase-auth
    image: supabase/gotrue:v2.167.0
    restart: unless-stopped
    healthcheck:
      test:
        [
          "CMD",
          "wget",
          "--no-verbose",
          "--tries=1",
          "--spider",
          "http://localhost:9999/health"
        ]
      timeout: 5s
      interval: 5s
      retries: 3
    depends_on:
      db:
        # Disable this if you are using an external Postgres database
        condition: service_healthy
      analytics:
        condition: service_healthy
    environment:
      GOTRUE_API_HOST: 0.0.0.0
      GOTRUE_API_PORT: 9999
      API_EXTERNAL_URL: ${API_EXTERNAL_URL}

      GOTRUE_DB_DRIVER: postgres
      GOTRUE_DB_DATABASE_URL: postgres://supabase_auth_admin:${POSTGRES_PASSWORD}@${POSTGRES_HOST}:${POSTGRES_PORT}/${POSTGRES_DB}

      GOTRUE_SITE_URL: ${SITE_URL}
      GOTRUE_URI_ALLOW_LIST: ${ADDITIONAL_REDIRECT_URLS}
      GOTRUE_DISABLE_SIGNUP: ${DISABLE_SIGNUP}

      GOTRUE_JWT_ADMIN_ROLES: service_role
      GOTRUE_JWT_AUD: authenticated
      GOTRUE_JWT_DEFAULT_GROUP_NAME: authenticated
      GOTRUE_JWT_EXP: ${JWT_EXPIRY}
      GOTRUE_JWT_SECRET: ${JWT_SECRET}

      GOTRUE_EXTERNAL_EMAIL_ENABLED: ${ENABLE_EMAIL_SIGNUP}
      GOTRUE_EXTERNAL_ANONYMOUS_USERS_ENABLED: ${ENABLE_ANONYMOUS_USERS}
      GOTRUE_MAILER_AUTOCONFIRM: ${ENABLE_EMAIL_AUTOCONFIRM}

      # Uncomment to bypass nonce check in ID Token flow. Commonly set to true when using Google Sign In on mobile.
      # GOTRUE_EXTERNAL_SKIP_NONCE_CHECK: true

      # GOTRUE_MAILER_SECURE_EMAIL_CHANGE_ENABLED: true
      # GOTRUE_SMTP_MAX_FREQUENCY: 1s
      GOTRUE_SMTP_ADMIN_EMAIL: ${SMTP_ADMIN_EMAIL}
      GOTRUE_SMTP_HOST: ${SMTP_HOST}
      GOTRUE_SMTP_PORT: ${SMTP_PORT}
      GOTRUE_SMTP_USER: ${SMTP_USER}
      GOTRUE_SMTP_PASS: ${SMTP_PASS}
      GOTRUE_SMTP_SENDER_NAME: ${SMTP_SENDER_NAME}
      GOTRUE_MAILER_URLPATHS_INVITE: ${MAILER_URLPATHS_INVITE}
      GOTRUE_MAILER_URLPATHS_CONFIRMATION: ${MAILER_URLPATHS_CONFIRMATION}
      GOTRUE_MAILER_URLPATHS_RECOVERY: ${MAILER_URLPATHS_RECOVERY}
      GOTRUE_MAILER_URLPATHS_EMAIL_CHANGE: ${MAILER_URLPATHS_EMAIL_CHANGE}

      GOTRUE_EXTERNAL_PHONE_ENABLED: ${ENABLE_PHONE_SIGNUP}
      GOTRUE_SMS_AUTOCONFIRM: ${ENABLE_PHONE_AUTOCONFIRM}
      # Uncomment to enable custom access token hook. Please see: https://supabase.com/docs/guides/auth/auth-hooks for full list of hooks and additional details about custom_access_token_hook

      # GOTRUE_HOOK_CUSTOM_ACCESS_TOKEN_ENABLED: "true"
      # GOTRUE_HOOK_CUSTOM_ACCESS_TOKEN_URI: "pg-functions://postgres/public/custom_access_token_hook"
      # GOTRUE_HOOK_CUSTOM_ACCESS_TOKEN_SECRETS: "<standard-base64-secret>"

      # GOTRUE_HOOK_MFA_VERIFICATION_ATTEMPT_ENABLED: "true"
      # GOTRUE_HOOK_MFA_VERIFICATION_ATTEMPT_URI: "pg-functions://postgres/public/mfa_verification_attempt"

      # GOTRUE_HOOK_PASSWORD_VERIFICATION_ATTEMPT_ENABLED: "true"
      # GOTRUE_HOOK_PASSWORD_VERIFICATION_ATTEMPT_URI: "pg-functions://postgres/public/password_verification_attempt"

      # GOTRUE_HOOK_SEND_SMS_ENABLED: "false"
      # GOTRUE_HOOK_SEND_SMS_URI: "pg-functions://postgres/public/custom_access_token_hook"
      # GOTRUE_HOOK_SEND_SMS_SECRETS: "v1,whsec_VGhpcyBpcyBhbiBleGFtcGxlIG9mIGEgc2hvcnRlciBCYXNlNjQgc3RyaW5n"

      # GOTRUE_HOOK_SEND_EMAIL_ENABLED: "false"
      # GOTRUE_HOOK_SEND_EMAIL_URI: "http://host.docker.internal:54321/functions/v1/email_sender"
      # GOTRUE_HOOK_SEND_EMAIL_SECRETS: "v1,whsec_VGhpcyBpcyBhbiBleGFtcGxlIG9mIGEgc2hvcnRlciBCYXNlNjQgc3RyaW5n"

  rest:
    container_name: supabase-rest
    image: postgrest/postgrest:v12.2.0
    restart: unless-stopped
    depends_on:
      db:
        # Disable this if you are using an external Postgres database
        condition: service_healthy
      analytics:
        condition: service_healthy
    environment:
      PGRST_DB_URI: postgres://authenticator:${POSTGRES_PASSWORD}@${POSTGRES_HOST}:${POSTGRES_PORT}/${POSTGRES_DB}
      PGRST_DB_SCHEMAS: ${PGRST_DB_SCHEMAS}
      PGRST_DB_ANON_ROLE: anon
      PGRST_JWT_SECRET: ${JWT_SECRET}
      PGRST_DB_USE_LEGACY_GUCS: "false"
      PGRST_APP_SETTINGS_JWT_SECRET: ${JWT_SECRET}
      PGRST_APP_SETTINGS_JWT_EXP: ${JWT_EXPIRY}
    command:
      [
        "postgrest"
      ]

  realtime:
    # This container name looks inconsistent but is correct because realtime constructs tenant id by parsing the subdomain
    container_name: realtime-dev.supabase-realtime
    image: supabase/realtime:v2.34.7
    restart: unless-stopped
    depends_on:
      db:
        # Disable this if you are using an external Postgres database
        condition: service_healthy
      analytics:
        condition: service_healthy
    healthcheck:
      test:
        [
          "CMD",
          "curl",
          "-sSfL",
          "--head",
          "-o",
          "/dev/null",
          "-H",
          "Authorization: Bearer ${ANON_KEY}",
          "http://localhost:4000/api/tenants/realtime-dev/health"
        ]
      timeout: 5s
      interval: 5s
      retries: 3
    environment:
      PORT: 4000
      DB_HOST: ${POSTGRES_HOST}
      DB_PORT: ${POSTGRES_PORT}
      DB_USER: supabase_admin
      DB_PASSWORD: ${POSTGRES_PASSWORD}
      DB_NAME: ${POSTGRES_DB}
      DB_AFTER_CONNECT_QUERY: 'SET search_path TO _realtime'
      DB_ENC_KEY: supabaserealtime
      API_JWT_SECRET: ${JWT_SECRET}
      SECRET_KEY_BASE: ${SECRET_KEY_BASE}
      ERL_AFLAGS: -proto_dist inet_tcp
      DNS_NODES: "''"
      RLIMIT_NOFILE: "10000"
      APP_NAME: realtime
      SEED_SELF_HOST: true
      RUN_JANITOR: true

  # To use S3 backed storage: docker compose -f docker-compose.yml -f docker-compose.s3.yml up
  storage:
    container_name: supabase-storage
    image: supabase/storage-api:v1.14.5
    restart: unless-stopped
    volumes:
      - ./volumes/storage:/var/lib/storage:z
    healthcheck:
      test:
        [
          "CMD",
          "wget",
          "--no-verbose",
          "--tries=1",
          "--spider",
          "http://storage:5000/status"
        ]
      timeout: 5s
      interval: 5s
      retries: 3
    depends_on:
      db:
        # Disable this if you are using an external Postgres database
        condition: service_healthy
      rest:
        condition: service_started
      imgproxy:
        condition: service_started
    environment:
      ANON_KEY: ${ANON_KEY}
      SERVICE_KEY: ${SERVICE_ROLE_KEY}
      POSTGREST_URL: http://rest:3000
      PGRST_JWT_SECRET: ${JWT_SECRET}
      DATABASE_URL: postgres://supabase_storage_admin:${POSTGRES_PASSWORD}@${POSTGRES_HOST}:${POSTGRES_PORT}/${POSTGRES_DB}
      FILE_SIZE_LIMIT: 52428800
      STORAGE_BACKEND: file
      FILE_STORAGE_BACKEND_PATH: /var/lib/storage
      TENANT_ID: stub
      # TODO: https://github.com/supabase/storage-api/issues/55
      REGION: stub
      GLOBAL_S3_BUCKET: stub
      ENABLE_IMAGE_TRANSFORMATION: "true"
      IMGPROXY_URL: http://imgproxy:5001

  imgproxy:
    container_name: supabase-imgproxy
    image: darthsim/imgproxy:v3.8.0
    restart: unless-stopped
    volumes:
      - ./volumes/storage:/var/lib/storage:z
    healthcheck:
      test:
        [
          "CMD",
          "imgproxy",
          "health"
        ]
      timeout: 5s
      interval: 5s
      retries: 3
    environment:
      IMGPROXY_BIND: ":5001"
      IMGPROXY_LOCAL_FILESYSTEM_ROOT: /
      IMGPROXY_USE_ETAG: "true"
      IMGPROXY_ENABLE_WEBP_DETECTION: ${IMGPROXY_ENABLE_WEBP_DETECTION}

  meta:
    container_name: supabase-meta
    image: supabase/postgres-meta:v0.84.2
    restart: unless-stopped
    depends_on:
      db:
        # Disable this if you are using an external Postgres database
        condition: service_healthy
      analytics:
        condition: service_healthy
    environment:
      PG_META_PORT: 8080
      PG_META_DB_HOST: ${POSTGRES_HOST}
      PG_META_DB_PORT: ${POSTGRES_PORT}
      PG_META_DB_NAME: ${POSTGRES_DB}
      PG_META_DB_USER: supabase_admin
      PG_META_DB_PASSWORD: ${POSTGRES_PASSWORD}

  functions:
    container_name: supabase-edge-functions
    image: supabase/edge-runtime:v1.66.5
    restart: unless-stopped
    volumes:
      - ./volumes/functions:/home/deno/functions:Z
    depends_on:
      analytics:
        condition: service_healthy
    environment:
      JWT_SECRET: ${JWT_SECRET}
      SUPABASE_URL: http://kong:8000
      SUPABASE_ANON_KEY: ${ANON_KEY}
      SUPABASE_SERVICE_ROLE_KEY: ${SERVICE_ROLE_KEY}
      SUPABASE_DB_URL: postgresql://postgres:${POSTGRES_PASSWORD}@${POSTGRES_HOST}:${POSTGRES_PORT}/${POSTGRES_DB}
      # TODO: Allow configuring VERIFY_JWT per function. This PR might help: https://github.com/supabase/cli/pull/786
      VERIFY_JWT: "${FUNCTIONS_VERIFY_JWT}"
    command:
      [
        "start",
        "--main-service",
        "/home/deno/functions/main"
      ]

  analytics:
    container_name: supabase-analytics
    image: supabase/logflare:1.4.0
    restart: unless-stopped
    ports:
      - 4000:4000
    # Uncomment to use Big Query backend for analytics
    # volumes:
    #   - type: bind
    #     source: ${PWD}/gcloud.json
    #     target: /opt/app/rel/logflare/bin/gcloud.json
    #     read_only: true
    healthcheck:
      test:
        [
          "CMD",
          "curl",
          "http://localhost:4000/health"
        ]
      timeout: 5s
      interval: 5s
      retries: 10
    depends_on:
      db:
        # Disable this if you are using an external Postgres database
        condition: service_healthy
    environment:
      LOGFLARE_NODE_HOST: 127.0.0.1
      DB_USERNAME: supabase_admin
      DB_DATABASE: _supabase
      DB_HOSTNAME: ${POSTGRES_HOST}
      DB_PORT: ${POSTGRES_PORT}
      DB_PASSWORD: ${POSTGRES_PASSWORD}
      DB_SCHEMA: _analytics
      LOGFLARE_API_KEY: ${LOGFLARE_API_KEY}
      LOGFLARE_SINGLE_TENANT: true
      LOGFLARE_SUPABASE_MODE: true
      LOGFLARE_MIN_CLUSTER_SIZE: 1

      # Comment variables to use Big Query backend for analytics
      POSTGRES_BACKEND_URL: postgresql://supabase_admin:${POSTGRES_PASSWORD}@${POSTGRES_HOST}:${POSTGRES_PORT}/_supabase
      POSTGRES_BACKEND_SCHEMA: _analytics
      LOGFLARE_FEATURE_FLAG_OVERRIDE: multibackend=true
      # Uncomment to use Big Query backend for analytics
      # GOOGLE_PROJECT_ID: ${GOOGLE_PROJECT_ID}
      # GOOGLE_PROJECT_NUMBER: ${GOOGLE_PROJECT_NUMBER}

  # Comment out everything below this point if you are using an external Postgres database
  db:
    container_name: supabase-db
    image: supabase/postgres:15.8.1.020
    restart: unless-stopped
    volumes:
      - ./volumes/db/realtime.sql:/docker-entrypoint-initdb.d/migrations/99-realtime.sql:Z
      # Must be superuser to create event trigger
      - ./volumes/db/webhooks.sql:/docker-entrypoint-initdb.d/init-scripts/98-webhooks.sql:Z
      # Must be superuser to alter reserved role
      - ./volumes/db/roles.sql:/docker-entrypoint-initdb.d/init-scripts/99-roles.sql:Z
      # Initialize the database settings with JWT_SECRET and JWT_EXP
      - ./volumes/db/jwt.sql:/docker-entrypoint-initdb.d/init-scripts/99-jwt.sql:Z
      # PGDATA directory is persisted between restarts
      - ./volumes/db/data:/var/lib/postgresql/data:Z
      # Changes required for internal supabase data such as _analytics
      - ./volumes/db/_supabase.sql:/docker-entrypoint-initdb.d/migrations/97-_supabase.sql:Z
      # Changes required for Analytics support
      - ./volumes/db/logs.sql:/docker-entrypoint-initdb.d/migrations/99-logs.sql:Z
      # Changes required for Pooler support
      - ./volumes/db/pooler.sql:/docker-entrypoint-initdb.d/migrations/99-pooler.sql:Z
      # Use named volume to persist pgsodium decryption key between restarts
      - db-config:/etc/postgresql-custom
    healthcheck:
      test:
        [
        "CMD",
        "pg_isready",
        "-U",
        "postgres",
        "-h",
        "localhost"
        ]
      interval: 5s
      timeout: 5s
      retries: 10
    depends_on:
      vector:
        condition: service_healthy
    environment:
      POSTGRES_HOST: /var/run/postgresql
      PGPORT: ${POSTGRES_PORT}
      POSTGRES_PORT: ${POSTGRES_PORT}
      PGPASSWORD: ${POSTGRES_PASSWORD}
      POSTGRES_PASSWORD: ${POSTGRES_PASSWORD}
      PGDATABASE: ${POSTGRES_DB}
      POSTGRES_DB: ${POSTGRES_DB}
      JWT_SECRET: ${JWT_SECRET}
      JWT_EXP: ${JWT_EXPIRY}
    command:
      [
        "postgres",
        "-c",
        "config_file=/etc/postgresql/postgresql.conf",
        "-c",
        "log_min_messages=fatal" # prevents Realtime polling queries from appearing in logs
      ]

  vector:
    container_name: supabase-vector
    image: timberio/vector:0.28.1-alpine
    restart: unless-stopped
    volumes:
      - ./volumes/logs/vector.yml:/etc/vector/vector.yml:ro
      - ${DOCKER_SOCKET_LOCATION}:/var/run/docker.sock:ro
    healthcheck:
      test:
        [
          "CMD",
          "wget",
          "--no-verbose",
          "--tries=1",
          "--spider",
          "http://vector:9001/health"
        ]
      timeout: 5s
      interval: 5s
      retries: 3
    environment:
      LOGFLARE_API_KEY: ${LOGFLARE_API_KEY}
    command:
      [
        "--config",
        "/etc/vector/vector.yml"
      ]

  # Update the DATABASE_URL if you are using an external Postgres database
  supavisor:
    container_name: supabase-pooler
    image: supabase/supavisor:1.1.56
    restart: unless-stopped
    ports:
      - ${POSTGRES_PORT}:5432
      - ${POOLER_PROXY_PORT_TRANSACTION}:6543
    volumes:
      - ./volumes/pooler/pooler.exs:/etc/pooler/pooler.exs:ro
    healthcheck:
      test:
        [
          "CMD",
          "curl",
          "-sSfL",
          "--head",
          "-o",
          "/dev/null",
          "http://127.0.0.1:4000/api/health"
        ]
      interval: 10s
      timeout: 5s
      retries: 5
    depends_on:
      db:
        condition: service_healthy
      analytics:
        condition: service_healthy
    environment:
      PORT: 4000
      POSTGRES_PORT: ${POSTGRES_PORT}
      POSTGRES_DB: ${POSTGRES_DB}
      POSTGRES_PASSWORD: ${POSTGRES_PASSWORD}
      DATABASE_URL: ecto://supabase_admin:${POSTGRES_PASSWORD}@db:${POSTGRES_PORT}/_supabase
      CLUSTER_POSTGRES: true
      SECRET_KEY_BASE: ${SECRET_KEY_BASE}
      VAULT_ENC_KEY: ${VAULT_ENC_KEY}
      API_JWT_SECRET: ${JWT_SECRET}
      METRICS_JWT_SECRET: ${JWT_SECRET}
      REGION: local
      ERL_AFLAGS: -proto_dist inet_tcp
      POOLER_TENANT_ID: ${POOLER_TENANT_ID}
      POOLER_DEFAULT_POOL_SIZE: ${POOLER_DEFAULT_POOL_SIZE}
      POOLER_MAX_CLIENT_CONN: ${POOLER_MAX_CLIENT_CONN}
      POOLER_POOL_MODE: transaction
    command:
      [
        "/bin/sh",
        "-c",
        "/app/bin/migrate && /app/bin/supavisor eval \"$$(cat /etc/pooler/pooler.exs)\" && /app/bin/server"
      ]

	nginx:
    	image: 'jc21/nginx-proxy-manager:latest'
    	restart: unless-stopped
    	ports:
     	 # These ports are in format <host-port>:<container-port>
  	    - '80:80'    # Public HTTP Port
   	    - '443:443'  # Public HTTPS Port
   	    - '81:81'    # Admin Web Port
   	  volumes:
  	    - ./nginx-data:/data
  	    - ./nginx-letsencrypt:/etc/letsencrypt
   	    - ./nginx-snippets:/snippets:ro
  	  environment:
   	    TZ: 'Europe/Berlin'

volumes:
  db-config:
Note: Don’t forget to save your changes to the file.
The text indicates that this is the beginning of what your final docker-compose.yml file should look like. It shows the usage instructions as comments and begins defining the services, starting with the studio service.
Step 8: Adjust the values inside your .env file
Now, you want to commit a few changes to your .env file. These changes include setting new secret keys and passwords, by replacing the placeholders.
We’ve highlighted the lines which you likely want to adjust.
############
# Secrets
# YOU MUST CHANGE THESE BEFORE GOING INTO PRODUCTION
############

POSTGRES_PASSWORD=your-super-secret-and-long-postgres-password
JWT_SECRET=your-super-secret-jwt-token-with-at-least-32-characters-long
ANON_KEY=eyJhbGciOiJIUzI1NiIsInR5cCI6IkpXVCJ9.eyAgCiAgICAicm9sZSI6ICJhbm9uIiwKICAgICJpc3MiOiAic3VwYWJhc2UtZGVtbyIsCiAgICAiaWF0IjogMTY0MTc2OTIwMCwKICAgICJleHAiOiAxNzk5NTM1NjAwCn0.dc_X5iR_VP_qT0zsiyj_I_OZ2T9FtRU2BBNWN8Bu4GE
SERVICE_ROLE_KEY=eyJhbGciOiJIUzI1NiIsInR5cCI6IkpXVCJ9.eyAgCiAgICAicm9sZSI6ICJzZXJ2aWNlX3JvbGUiLAogICAgImlzcyI6ICJzdXBhYmFzZS1kZW1vIiwKICAgICJpYXQiOiAxNjQxNzY5MjAwLAogICAgImV4cCI6IDE3OTk1MzU2MDAKfQ.DaYlNEoUrrEn2Ig7tqibS-PHK5vgusbcbo7X36XVt4Q
DASHBOARD_USERNAME=supabase
DASHBOARD_PASSWORD=this_password_is_insecure_and_should_be_updated
SECRET_KEY_BASE=UpNVntn3cDxHJpq99YMc1T1AQgQpc8kfYTuRgBiYa15BLrx8etQoXz3gZv1/u2oq
VAULT_ENC_KEY=your-encryption-key-32-chars-min


############
# Database - You can change these to any PostgreSQL database that has logical replication enabled.
############

POSTGRES_HOST=db
POSTGRES_DB=postgres
POSTGRES_PORT=5432
# default user is postgres


############
# Supavisor -- Database pooler
############
POOLER_PROXY_PORT_TRANSACTION=6543
POOLER_DEFAULT_POOL_SIZE=20
POOLER_MAX_CLIENT_CONN=100
POOLER_TENANT_ID=your-tenant-id


############
# API Proxy - Configuration for the Kong Reverse proxy.
############

KONG_HTTP_PORT=8000
KONG_HTTPS_PORT=8443


############
# API - Configuration for PostgREST.
############

PGRST_DB_SCHEMAS=public,storage,graphql_public


############
# Auth - Configuration for the GoTrue authentication server.
############

## General
SITE_URL=http://localhost:3000
ADDITIONAL_REDIRECT_URLS=
JWT_EXPIRY=3600
DISABLE_SIGNUP=false
API_EXTERNAL_URL=http://supabase.example.com

## Mailer Config
MAILER_URLPATHS_CONFIRMATION="/auth/v1/verify"
MAILER_URLPATHS_INVITE="/auth/v1/verify"
MAILER_URLPATHS_RECOVERY="/auth/v1/verify"
MAILER_URLPATHS_EMAIL_CHANGE="/auth/v1/verify"

## Email auth
ENABLE_EMAIL_SIGNUP=true
ENABLE_EMAIL_AUTOCONFIRM=false
SMTP_ADMIN_EMAIL=admin@example.com
SMTP_HOST=supabase-mail
SMTP_PORT=2500
SMTP_USER=fake_mail_user
SMTP_PASS=fake_mail_password
SMTP_SENDER_NAME=fake_sender
ENABLE_ANONYMOUS_USERS=false

## Phone auth
ENABLE_PHONE_SIGNUP=true
ENABLE_PHONE_AUTOCONFIRM=true


############
# Studio - Configuration for the Dashboard
############

STUDIO_DEFAULT_ORGANIZATION=Default Organization
STUDIO_DEFAULT_PROJECT=Default Project

STUDIO_PORT=3000
# replace if you intend to use Studio outside of localhost
SUPABASE_PUBLIC_URL=http://supastudio.example.com

# Enable webp support
IMGPROXY_ENABLE_WEBP_DETECTION=true

# Add your OpenAI API key to enable SQL Editor Assistant
OPENAI_API_KEY=


############
# Functions - Configuration for Functions
############
# NOTE: VERIFY_JWT applies to all functions. Per-function VERIFY_JWT is not supported yet.
FUNCTIONS_VERIFY_JWT=false


############
# Logs - Configuration for Logflare
# Please refer to https://supabase.com/docs/reference/self-hosting-analytics/introduction
############

LOGFLARE_LOGGER_BACKEND_API_KEY=your-super-secret-and-long-logflare-key

# Change vector.toml sinks to reflect this change
LOGFLARE_API_KEY=your-super-secret-and-long-logflare-key

# Docker socket location - this value will differ depending on your OS
DOCKER_SOCKET_LOCATION=/var/run/docker.sock

# Google Cloud Project details
GOOGLE_PROJECT_ID=GOOGLE_PROJECT_ID
GOOGLE_PROJECT_NUMBER=GOOGLE_PROJECT_NUMBER
Note: You don’t need to change all of the highlighted line. But it’s highly recommended to adjust the following lines: 6, 7, 8, 9, 10, 11, 55, 59, 92, 113, 116
Step 9: Start your application
Finally, you can start your application.
First, use:
docker compose pullNote: This process might take some time to complete.
Next, use:
docker compose up -dNote: This process might take some time to complete as well.
Step 10: Log in to Nginx Proxy Manager
Now, access your server through its IP address on Port 81 in your web browser.
For example: 012.345.678.90:81
The default login credentials to the Nginx Proxy Manager are the following:
- Email:
admin@example.com - Password:
changeme
Please remember to change those credentials after your first login.
Step 11: Setting up Proxy Hosts
You want to set up three different Proxy Hosts.
Those are:
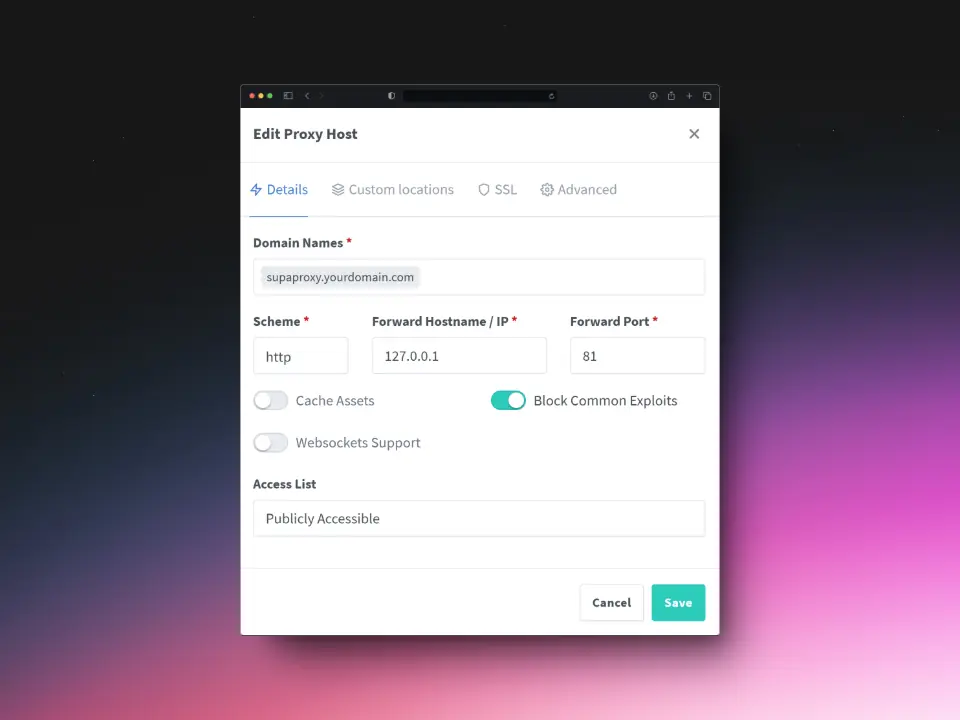
- supaproxy.yourdomain.com → Nginx Proxy Manager (secure access)
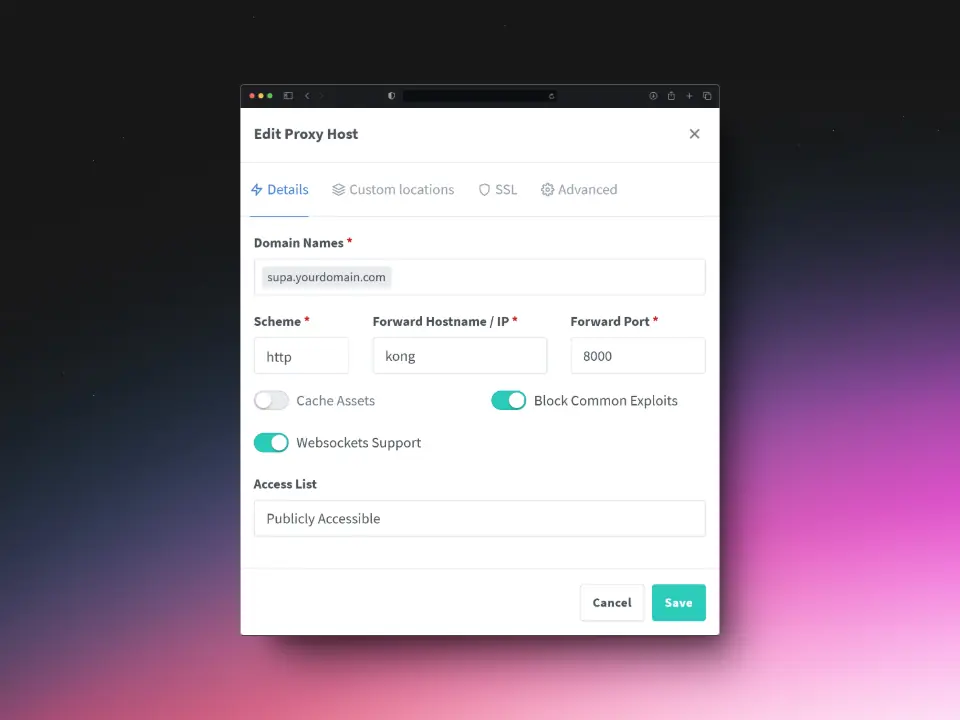
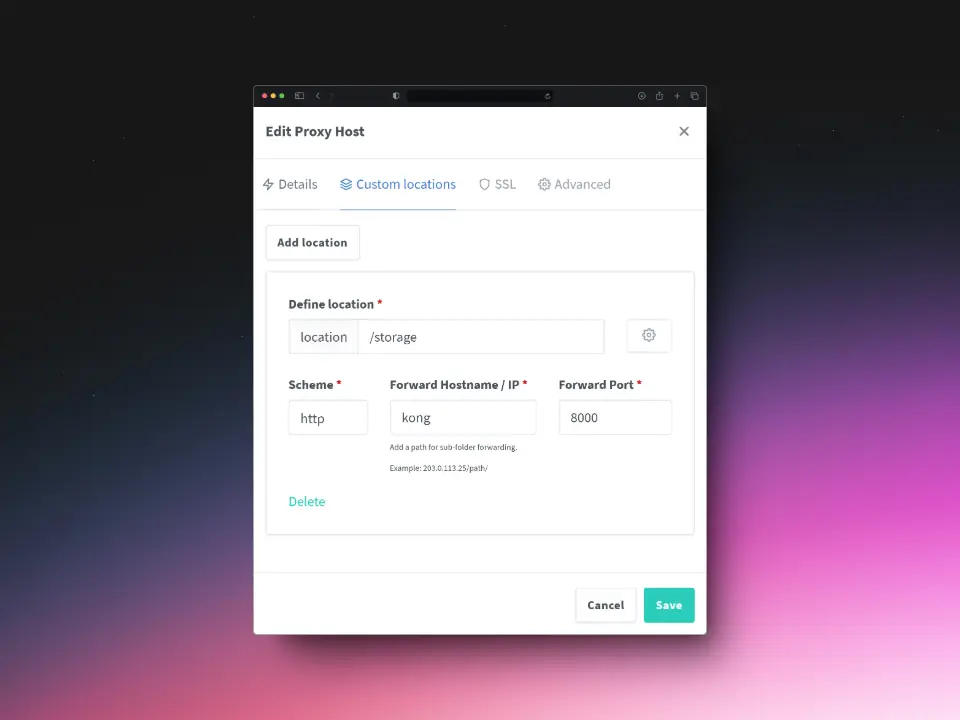
- supa.yourdomain.com → Kong (needed to access Supabase’s storage)
- studio.yourdomain.com → Supabase Studio (the visual back-end)
Make sure to set up these three records in the DNS settings of your domain registrar before continuing with the setup of each proxy host. Therefore, you need to connect each subdomain (e.g., studio) through an A-record to your server’s IP address (e.g., 012.345.678.90).
The result could look like this:
| Record type | Name | Content |
|---|---|---|
| A | studio | 012.345.678.90 |
Note: You must replace yourdomain.com with your own domain. If you wish, you can also choose other subdomain names.
Number 1: Setting up a Proxy Host for the Nginx Proxy Manager
Use the following settings to correctly configure supaproxy.yourdomain.com.
Details
SSL
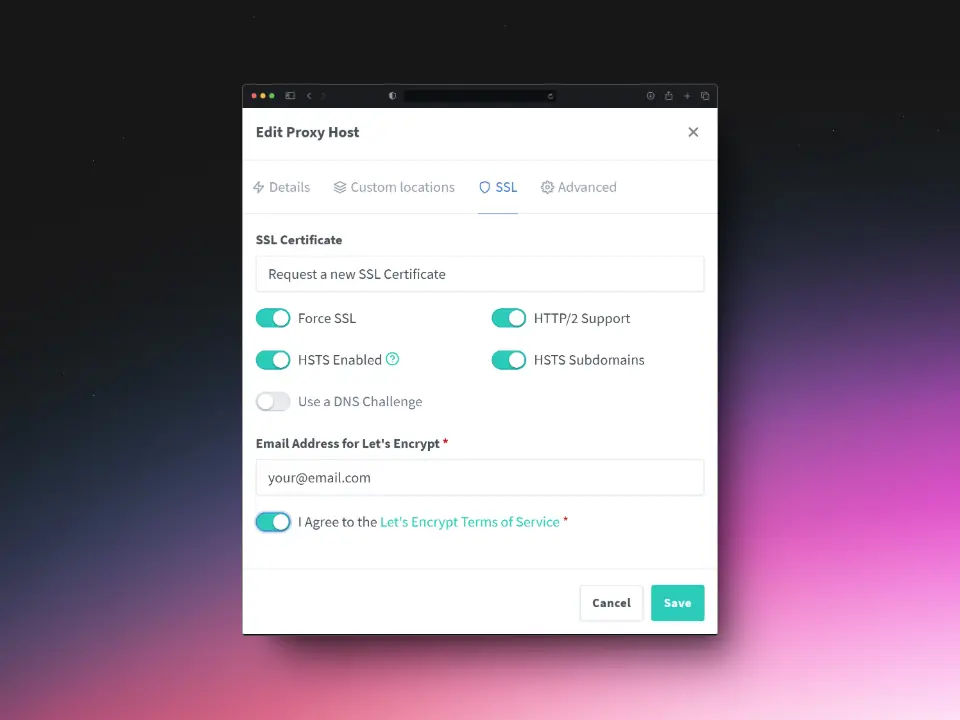
Click Save to apply the settings.
Number 2: Setting up a Proxy Host for Kong
Use the following settings to correctly configure supa.yourdomain.com.
Details
Custom Locations
SSL
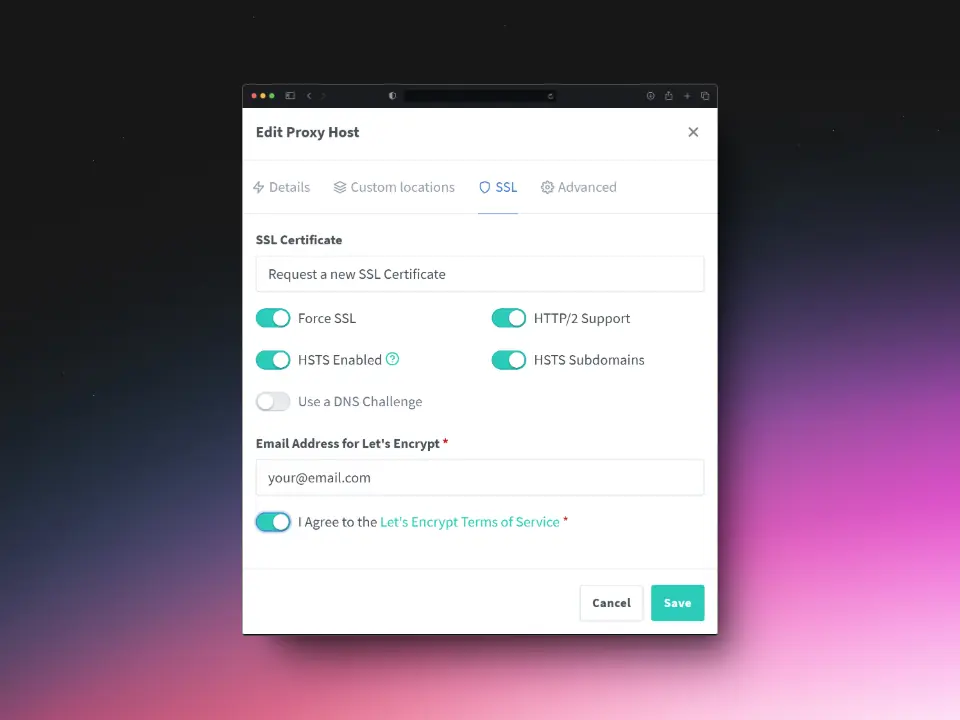
Click Save to apply the settings.
Number 3: Setting up a Proxy Host for Supabase Studio
Use the following settings to correctly configure studio.yourdomain.com.
Details
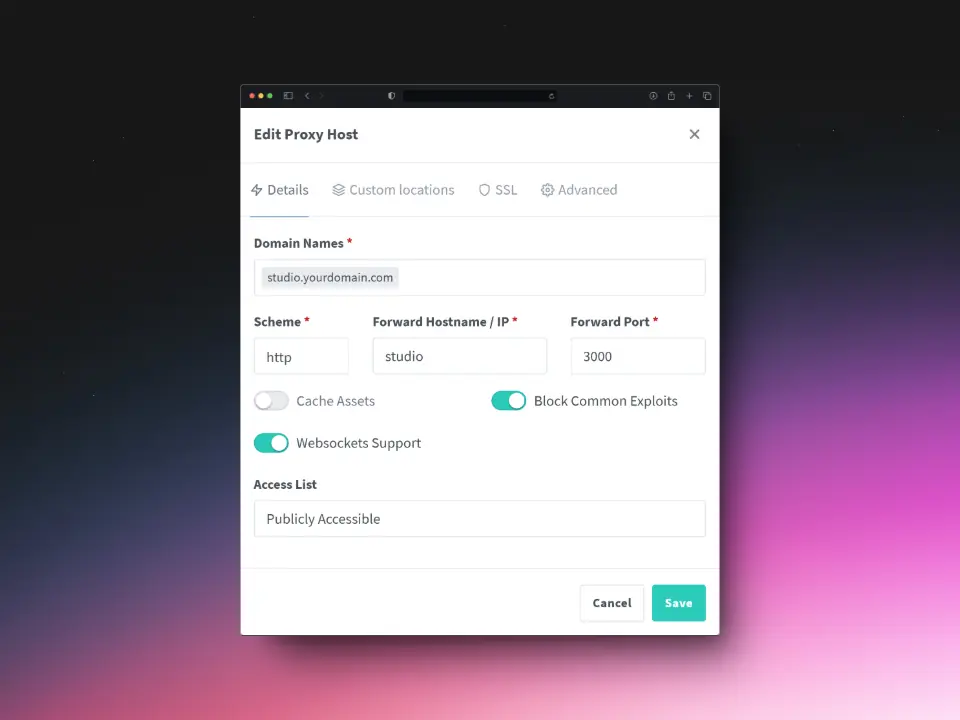
SSL
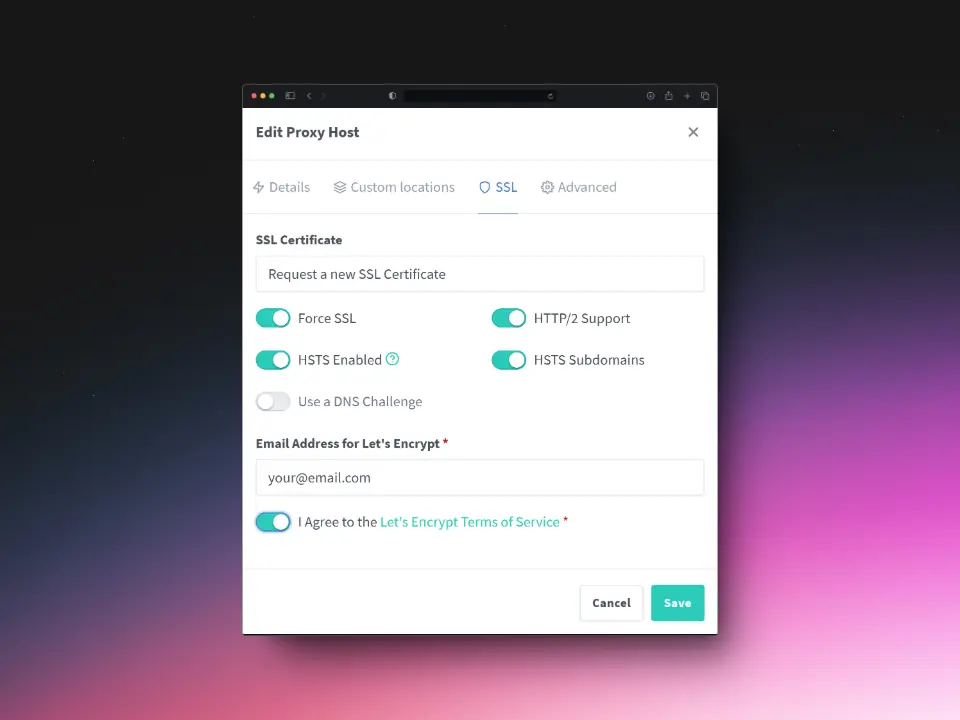
Click Save to apply the settings.
Access your new Supabase instance
TO access your new Supabase instance/installations, simply access studio.yourdomain.com through your web-browser.


Leave a Reply